Page 442 - 4300 Catalog Cover.pdf
SEO Version


4300 Catalog
Assembly / Installation
Parker Hannifin Corporation
Tube Fittings Division
Columbus, Ohio
T32
EO-2 Assembly
The steps for the proper assembly of the EO-2 fittings are similar
to those of the EO fitting:
1. Cutting, deburring and cleaning of the tube
2. Pre-set of the retaining ring
3. Inspection of the pre-set
4. Installation
For step 1 (cutting, deburring and cleaning of the tube) please
refer to
Pre-set of the Retaining Ring
The EO-2 functional nut consists of the nut, the sealing ring
and the retaining ring. Unlike the EO fitting, the sealing and
holding functions are performed by two separate components:
the sealing ring and the retaining ring. The retaining ring must
be pre-set to create the necessary bite on the tube O.D. The
two methods to pre-set the retaining ring are:
• Manually with the fitting body or hardened pre-assembly
tool (VOMO)
• Hydraulically with the EO-Karrymat, EOMAT III, Hydra Tool
or Hyferset
Pre-set Using the Fitting Body or Hardened
Pre-Assembly Tool
1.
Prepare the fitting or hardened pre-assembly tool by lubri-
cating the threads of the following sizes:
Steel Fittings:
20, 22, 25, 28 *Lubrication is recommended for ease in
assembly
Stainless Steel Fitting:
For all sizes, lubrication is recommended for ease in
assembly
High quality Niromont (liquid or paste) is recommended for
lubrication of the fitting body threads.
It is strongly recommended that a hydraulic tool be
used to preset EO-2 fittings in sizes 30S, 35L, 38S and
42L.
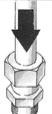
2. Insert tube into the EO-2 fitting body or hardened pre-as-
sembled tool and press hard against the stop in the inner
cone.
Note:
A faulty assembly will result if the tube is not against
the tube stop in the fitting body or hardened pre-assembly
tool. To achieve the necessary assembling force, an ad-
ditional wrench leverage may be necessary for tube O.D.’s
20mm and larger.
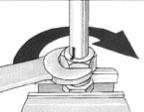
3. Turn nut until wrench resistance is felt. Tighten nut further
1 to 1-1/2 turns. As a recommended process control, mark
the position of the nut relative to the fitting body.
Pre-set Inspection
Loosen the nut and check that the gap between the sealing ring
and retaining ring is fully closed. A slight gap (up to 0.2mm) due
to spring back is acceptable.
Pre-set Using EO-Karrymat, Hyferset,
Hydra-Tool and EOMAT III
EO-Karrymat:
Recommended for use with EO-2 fittings
from 6mm through to 42mm.
Hyferset:
Recommended for use with EO-2 fittings
from 6mm through to 28mm.
Hydra-Tool:
Recommended for use with EO-2 fittings
from 6mm through to 42mm.
EOMAT III:
Recommended for use with EO-2 fittings
from 6mm through to 42mm.
For
i
nstruct
i
ons on operat
i
ng one of these mach
i
nes, refer to
the follow
i
ng bullet
i
ns:
• EO-Karrymat – Bulletin 4044-T1/UK/DE/FR/IT
• Hyferset – Bulletin 4393-B1
• Hydra-Tool – Bulletin 4392-B10
• EOMAT III – Catalogue 4043-1/GB
EO-2 Assembly
Powered by FlippingBook Publisher