Page 443 - 4300 Catalog Cover.pdf
SEO Version


4300 Catalog
Assembly / Installation
Parker Hannifin Corporation
Tube Fittings Division
Columbus, Ohio
T33
Installation
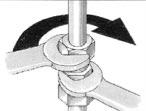
Connect tube and nut to fitting body. Holding the body rigid,
tighten nut with a wrench until resistance is felt.Continue turning
the nut approximately 1/6 to ¼ turns (= 1 to 1 1/2 flats) to the
same position as it was prior to disassembly.
If
the assembled position was marked, reassemble until the
marksmatch.Toachieve thenecessary assembling force, usean
additional wrench leverage for tube O.D.’s 20 mm and larger.
Step 1
Step 2
Caution:
Improper tighteningmay reduce theseal reliability, pres-
sure capability and the vibration resistance of the connection.
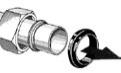
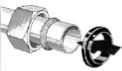
Re-Assembly with Replacement of Sealing
Ring (DOZ)
1. After the nut has been loosened, the sealing ring can be
pulled off the tube end. It must be checked for damage and
replaced if necessary.
2. Push new sealing ring onto the tube, with metal inner cone
facing the retaining ring.
3. Re-install using the installation procedures previously
covered in this section.
EO-2 Troubleshooting Guide
Problems with bite type hydraulic fittings are most often traced
to faulty pre-set/assembly procedure.
Table T26 — EO-2 troubleshooting guide
Problem/
Probable Cause
Remedy
Tube not bottomed
The tube end is not in firm contact
with the fitting body at assembly. The
tubing was not completely inserted
into the throat of the fitting body until
it bottomed out. Failure to bottom
out the tubing against the tube stop
of the fitting body during the preset-
ting procedure will allow the tube to
travel forward with the ferrule result-
ing in a shallow bite. This assembly
should be scrapped.
Shallow bite
After presetting, inspect to see that
the gap between the bite ring and
the sealing ring is closed. A failure
to achieve a closed gap can be
traced to the nut not being tight-
ened enough. This assembly can be
reworked by completing the assem-
bly instructions as indicated in the
catalog. Utilization of lubrication and
wrench elongation may be neces-
sary for larger sizes.
Damaged Seals
Check sealing area for contamina-
tion such as chips, zinc particles or
other dirt. Also check the inner cone
of the fitting body and tubing for
damage. Replace DOZ sealing ring
if necessary.
Fatigue Crack
Ensure proper assembly techniques
at Bite
are utilized. Utilize lubrication and
wrench elongation for larger sizes.
Check that the gap between the
sealing ring and bite ring are closed.
Fatigue Crack at
Check that the application does not
Rear Shoulder of
have excessive vibration. Utilize
Bite Ring
rigid clamping, tension piping or
hose assemblies if relative move-
ments are evident.
Distorted FM
Utilize a split die nut back up plate
Functional Nut at
for presetting of 35L and 42L
Hydraulic Pre-
functional nuts.
Assembly
EO-2 Assembly
Powered by FlippingBook Publisher